Banjo Setup & Maintenance
We Found a 1979 Stelling Field Service Manual in Our Archives
Jan
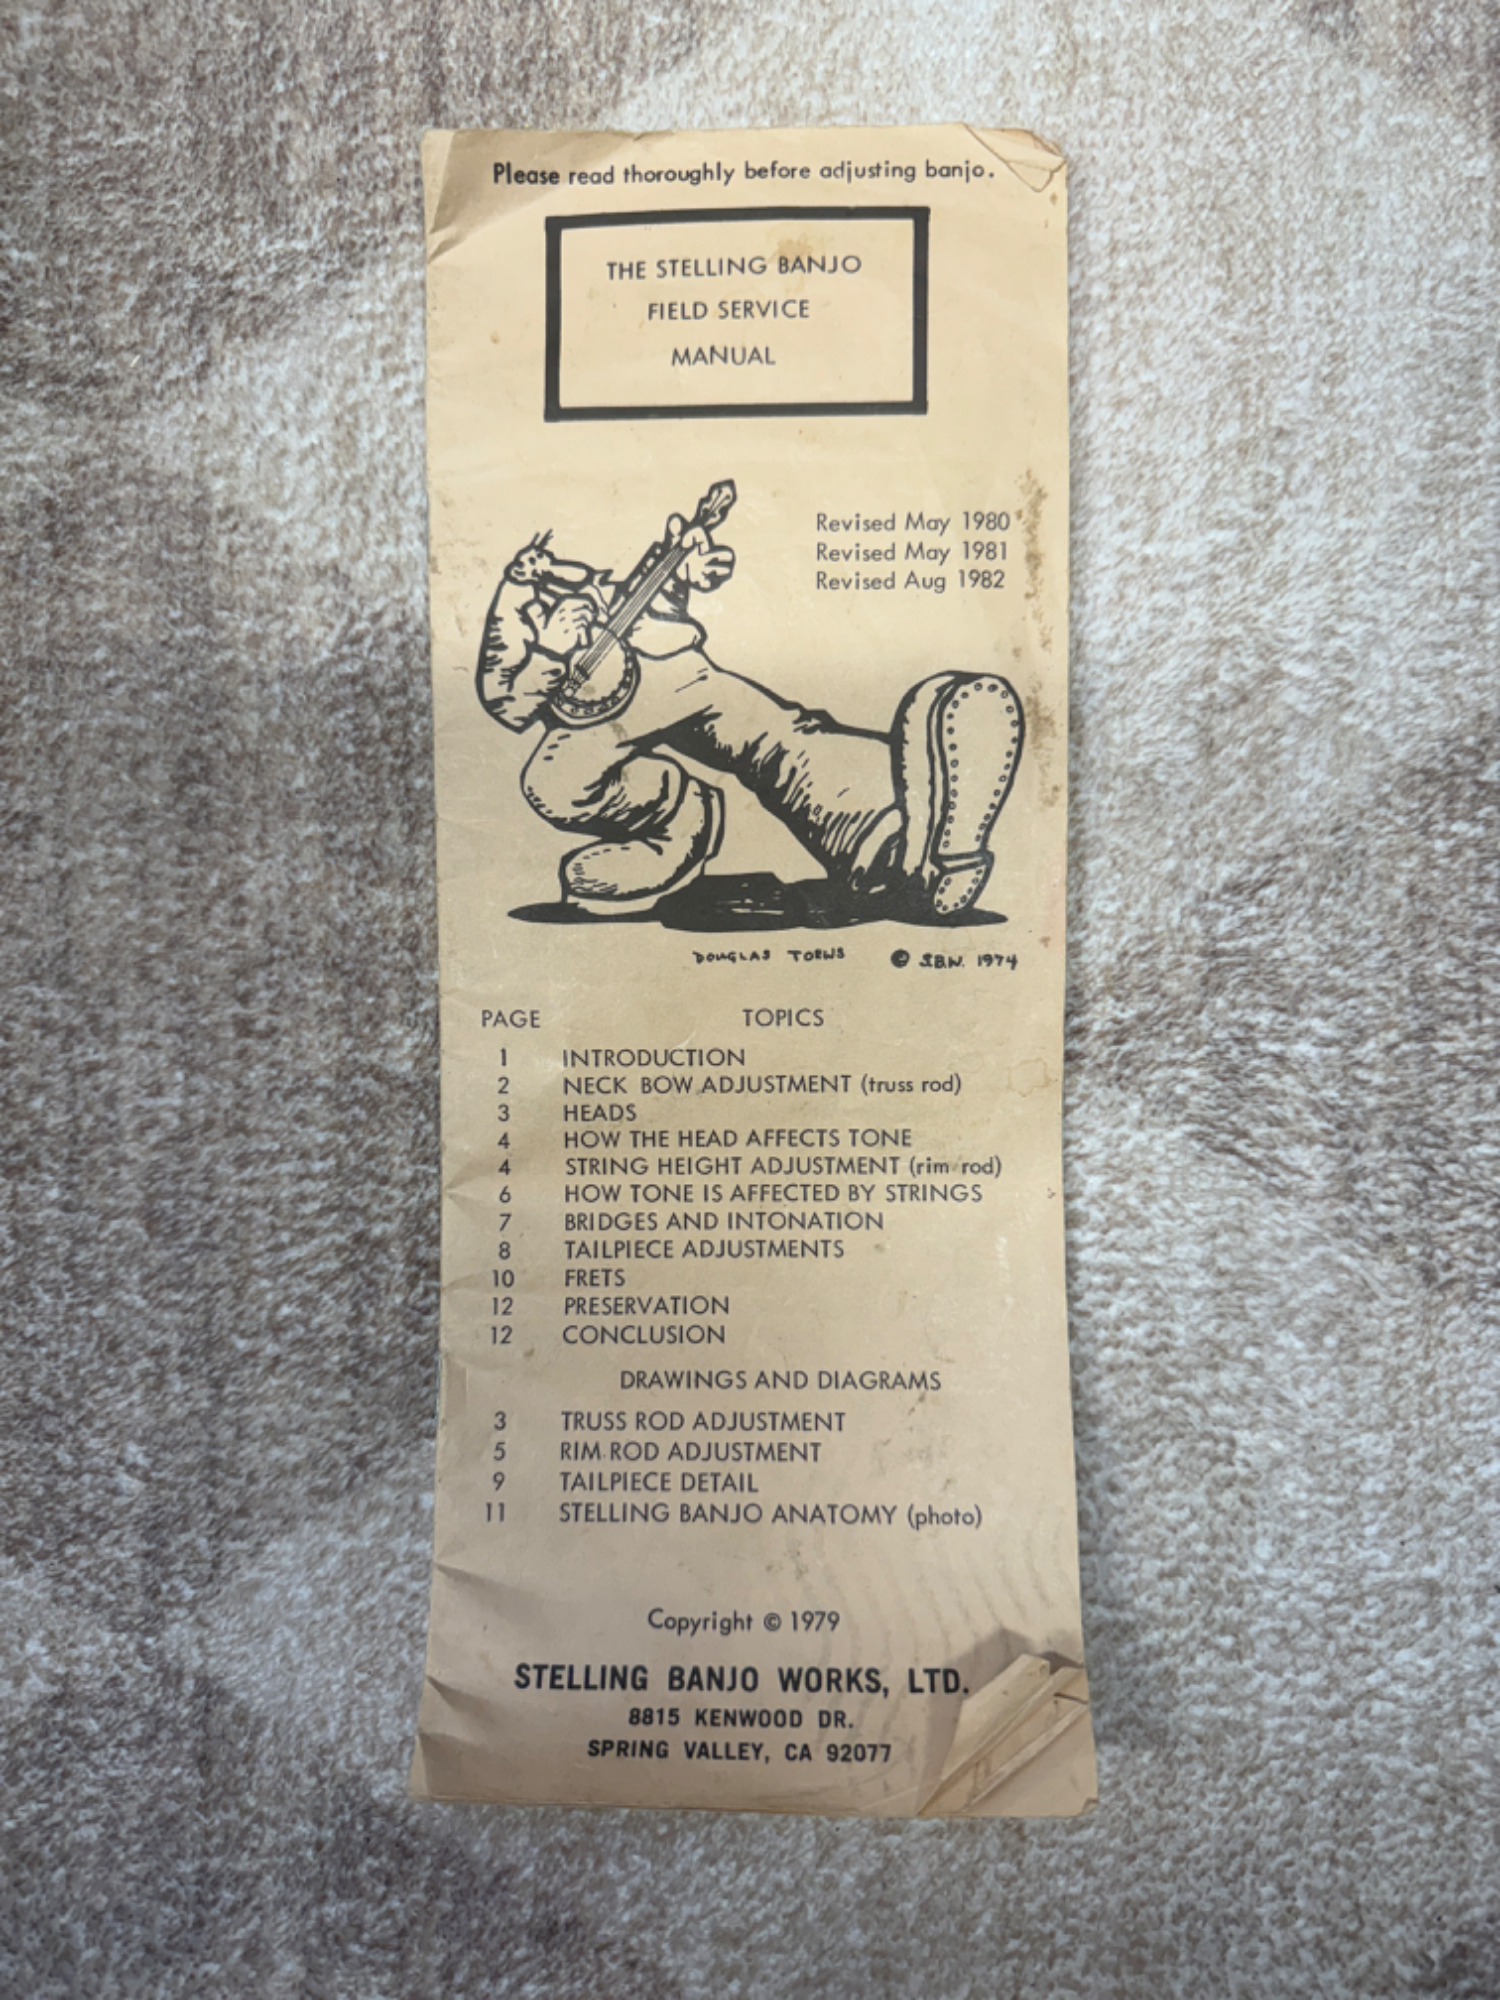
While digging through some old paperwork the other day, we came across something special: a well-worn copy of The Stelling Banjo Field Service Manual, copyright 1979, with handwritten revisions through August 1982.
This isn’t just an instruction booklet. It’s a time capsule written by Geoff Stelling himself, complete with hand-drawn diagrams, personal anecdotes, and the kind of practical wisdom that only comes from building thousands of instruments by hand.

The manual opens with a quote from Chuck Erikson: “The banjo is the hot rod of bluegrass instruments. The banjo is, in my opinion, the most adjustable of all stringed instruments and, in many cases, the most mal-adjusted.”
Stelling goes on to share stories from his shop floor—like the time an Alan Munde fan brought in a brand-new Stelling, frustrated that it didn’t sound like Alan’s banjo on “Alan Munde’s Banjo Sandwich.” The customer had his head cranked tight, strings bottomed out, bridge thinned down, tailpiece practically touching the head. When Stelling explained that Alan’s setup was exactly the opposite—strings at 1/4″ above the 22nd fret, medium head tension, tailpiece 3/8″ off the head—”I imagine his eyes began to open.”
That’s the kind of insight you don’t find in modern PDF manuals.
Why We’re Sharing This
At Banjo Warehouse, we believe this kind of knowledge should be preserved and shared. These vintage documents represent the accumulated wisdom of master builders—people who spent their lives perfecting the art and science of banjo setup and repair.
This is the first in a series of vintage banjo documentation we’ll be sharing here on the blog—original manuals, setup guides, and technical documents from the great American banjo makers. We’ve photographed every page and transcribed the full text below so you can search it and reference it anytime.
What’s Inside
The manual covers everything a Stelling owner—or really, any five-string banjo player—needs to know about setup and maintenance:
- Neck bow adjustment (truss rod)
- Head tension and how it affects tone
- String height adjustment (rim rod)
- Bridge selection and intonation
- Tailpiece adjustments for tone
- Fret leveling and replacement
- Preservation and cleaning
But beyond the technical content, it’s Stelling’s voice that makes this manual special. He writes like he’s sitting across from you at his workbench, walking you through each adjustment with patience and humor. When discussing clear plastic heads, he notes that Stelling doesn’t recommend them “because they tend to scratch easily and might over-brighten the tone of a Stelling. They also allow bridges to slip out of position easily.”
Want to talk bridges? He gives you Snuffy Smith’s phone number (please don’t call it).
Prefer to Let a Pro Handle It?
DIY setup isn’t for everyone—and some jobs really do require an experienced hand. If you’d rather have your banjo professionally set up, adjusted, or restored, our repair-and-restoration tech Tara Buchy can help. She handles everything from basic setups to full restorations, and she knows Stellings inside and out.
Learn more about our professional banjo setup and restoration services →
Help Us Build the Collection
Do you have old banjo manuals, setup guides, or technical documentation sitting in a drawer somewhere? We’d love to hear from you. Our goal is to share as much vintage banjo knowledge as we can—free and accessible to anyone who wants to learn.
Email us at thebanjowarehouse@gmail.com or drop us a note on social media. And if you’re a Stelling owner, we’d especially love to hear your stories about these instruments.
Good pickin’,
Full Transcript: The Stelling Banjo Field Service Manual (1979)
The complete text of the manual is provided below for reference and searchability. For the original layout and hand-drawn diagrams, see the photos above.
Click to expand full transcript
How to Keep You and your Banjo Best of Friends
Thank you and congratulations for owning a Stelling! We appreciate the investment you’ve made and we want you to know from the start that we are here to help you protect that investment and get the most from it. This is by no means an exhaustive banjo repair manual. It is intended as a quick reference to remedy the average banjo problems and is in a size convenient enough to fit most banjo cases.
There are several very important considerations to be discussed with every new owner of a Stelling. Your banjo was “tuned” and set-up at Stelling Banjo Works to achieve, in my opinion, the maximum volume and most acceptable tone. To maintain that tone and volume, certain head, tail piece, and neck “settings” are required. Any deviations from those settings may cause loss of volume, a less desirable tone, and string rattle or buzz. Inasmuch as each musician has his or her preference for sound, a banjo has peak adjustments for each person’s preferred sound. To give you a prime example, I will relate a comment made by an Alan Munde fan who had a new Stelling, but it was set up totally different from Alan’s. The person in question happened to like the sound of Alan’s banjo on the recording “Alan Munde’s Banjo Sandwich.” After playing his new banjo and comparing it to the sound of Alan’s on the record, he observed a marked difference between the two banjos although they were both Stellings. My first question to this person was “Can you describe they way your strings, head, and tail piece are adjusted?” His reply was, “I have my head as tight as it’ll go, my strings are as low as possible without buzzing, the bridge is thinned down real nice, and I keep the tail piece just about touching the head. And, oh yeah, I have a clear plastic head and real light strings.”
When I told him that Alan’s strings were 1/4″ above the 22nd fret, his head was medium tight, and his tail piece about 3/8″ off the head, I imagine his eyes began to open. Although there are obvious differences in picking styles and the inherent qualities of every banjo, basic banjo set-up has quite a bit to do with the tone and volume that a banjo can produce.
Introduction
As Chuck Erikson (a noted wood and shell supplier and author of books on inlaying and banjo building) once said, “The banjo is the hot rod of bluegrass instruments.” The banjo is, in my opinion, the most adjustable of all stringed instruments and, in many cases, the most mal-adjusted.
Since the banjo has so many adjustable parts and changeable components such as strings, bridge, tailpiece and the head, you should consider all adjustments and the effects each part has on tone and volume before you make any changes. Also, please realize that on a new banjo, you must make periodic adjustments until that banjo settles in and stabilizes. On 90% of the new banjos I’ve had to readjust, the head was too loose and the truss rod was out of adjustment. Please read and use the suggestions in this booklet. Don’t be afraid to adjust your banjo. However, please do it in this order:
- Check your neck bow and adjust the truss rod first.
- Check the head tension next.
- Adjust string height last.
After all those adjustments are made, check your bridge position and adjust the tailpiece for tone. I’ve used this procedure on over 2000 Stelling banjos. It’s the fastest, most surefire way to keep your banjo at its best.
Neck Adjustment
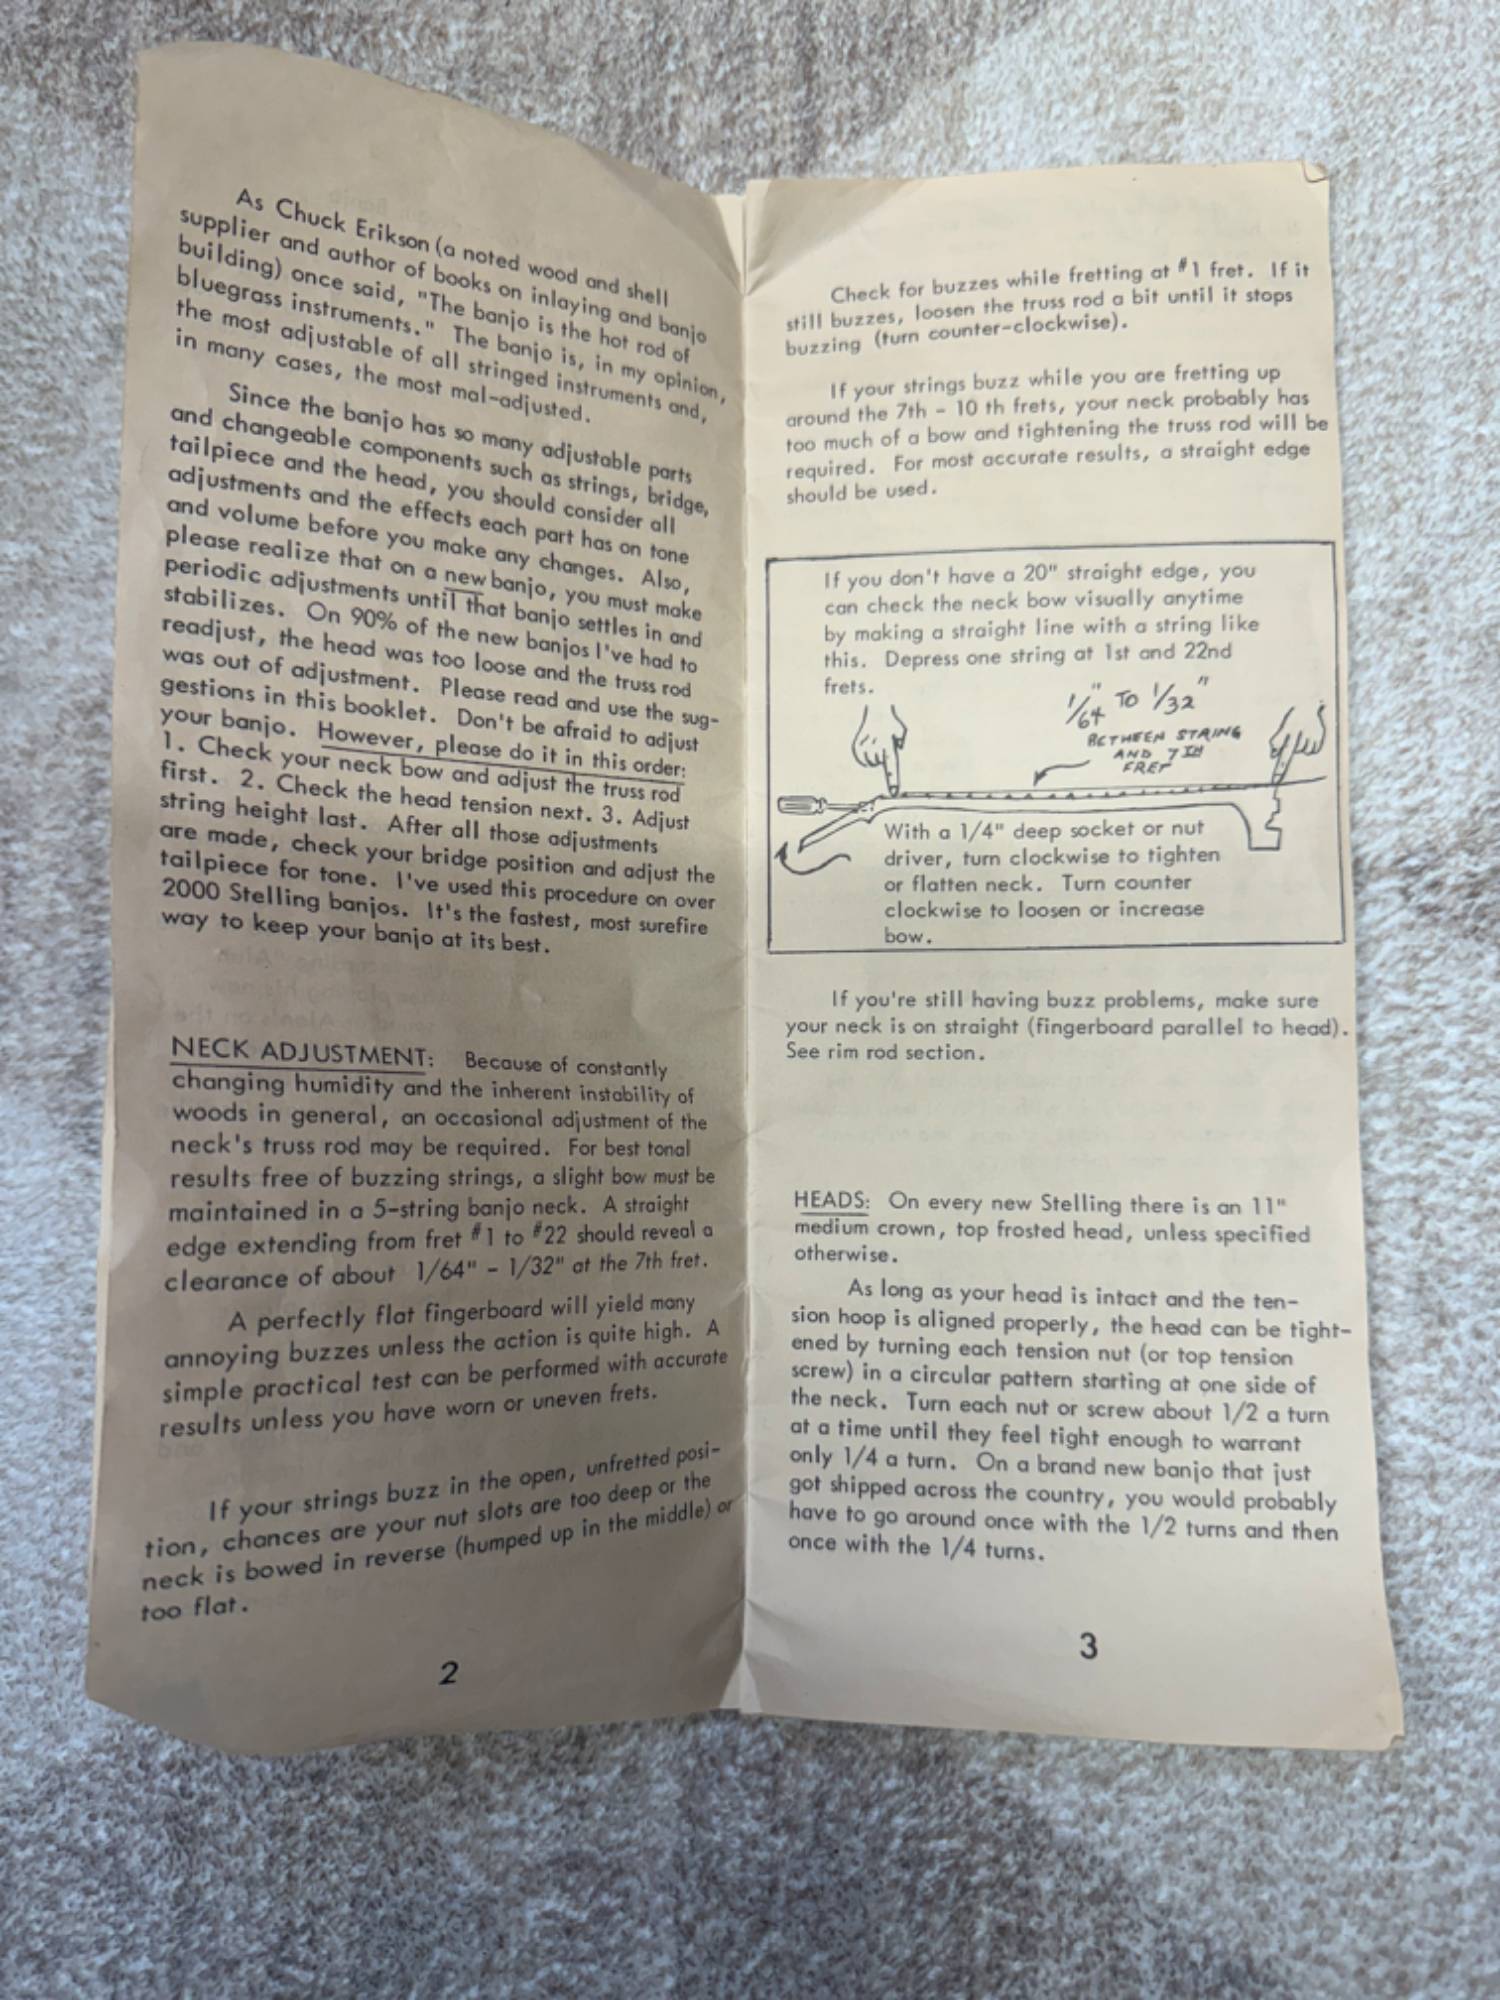
Because of constantly changing humidity and the inherent instability of woods in general, an occasional adjustment of the neck’s truss rod may be required. For best tonal results free of buzzing strings, a slight bow must be maintained in a 5-string banjo neck. A straight edge extending from fret #1 to #22 should reveal a clearance of about 1/64″ – 1/32″ at the 7th fret.
A perfectly flat fingerboard will yield many annoying buzzes unless the action is quite high. A simple practical test can be performed with accurate results unless you have worn or uneven frets.
If your strings buzz in the open, unfretted position, chances are your nut slots are too deep or the neck is bowed in reverse (humped up in the middle) or too flat.
Check for buzzes while fretting at #1 fret. If it still buzzes, loosen the truss rod a bit until it stops buzzing (turn counter-clockwise).
If your strings buzz while you are fretting up around the 7th – 10th frets, your neck probably has too much of a bow and tightening the truss rod will be required. For most accurate results, a straight edge should be used.
If you don’t have a 20″ straight edge, you can check the neck bow visually anytime by making a straight line with a string like this: Depress one string at 1st and 22nd frets. You should see 1/64″ to 1/32″ clearance between string and 7th fret.
With a 1/4″ deep socket or nut driver, turn clockwise to tighten or flatten neck. Turn counter clockwise to loosen or increase bow.
If you’re still having buzz problems, make sure your neck is on straight (fingerboard parallel to head). See rim rod section.
Heads
On every new Stelling there is an 11″ medium crown, top frosted head, unless specified otherwise.
As long as your head is intact and the tension hoop is aligned properly, the head can be tightened by turning each tension nut (or top tension screw) in a circular pattern starting at one side of the neck. Turn each nut or screw about 1/2 a turn at a time until they feel tight enough to warrant only 1/4 a turn. On a brand new banjo that just got shipped across the country, you would probably have to go around once with the 1/2 turns and then once with the 1/4 turns.
If your banjo all of a sudden sounds awful and the head won’t tighten up in one or more spots, the problem may be caused by a broken head if it’s a Remo head, or by the head pulling out of the hoop if its a Ludwig or 5-Star.
To replace the head, you must know how to disassemble and reassemble the banjo, as the head more or less holds the entire pot together. If you haven’t done it before, now’s a good time to learn. The main thing is to make sure everything is lined up properly before tightening all the connections completely. If the neck butts up against the tension hoop, the neck has to be loosened a bit using the coordinating rods before you can get the head off. Earlier Stellings had a gap built in so that the neck did not have to be loosened for this procedure.
How the Head Affects Tone
One misconception a lot of people have is that you get a nice mellow gutsy sound with a loose head. That’s not the whole truth. Once a banjo has been together for a long time and all the parts have settled in, the head can be adjusted to a position where it will stay. Until a banjo is at least 6 months or a year old, the head should be kept fairly tight. Remember, the head holds the pot together and for a good, clean, solid sound, it needs to be tightened solidly. If you can tell its pitch, try to bring it up to an A. Head adjusting definitely takes practice. It has been my experience that most new banjo owners allow their head to go loose. That is not to say that you can’t get it too tight. If the head is too loose, a banjo will sound clangy. The tone won’t be clear, solid, and crisp. As the head gets too tight, the banjo starts to sound thin with a loss of bass response. See the sections on bridge, strings, and tailpiece adjustments for more information on tone.
A note on clear heads: We don’t recommend them in general, because they tend to scratch easily and might over-brighten the tone of a Stelling. They also allow bridges to slip out of position easily.
Rim Rod and String Height Adjustment
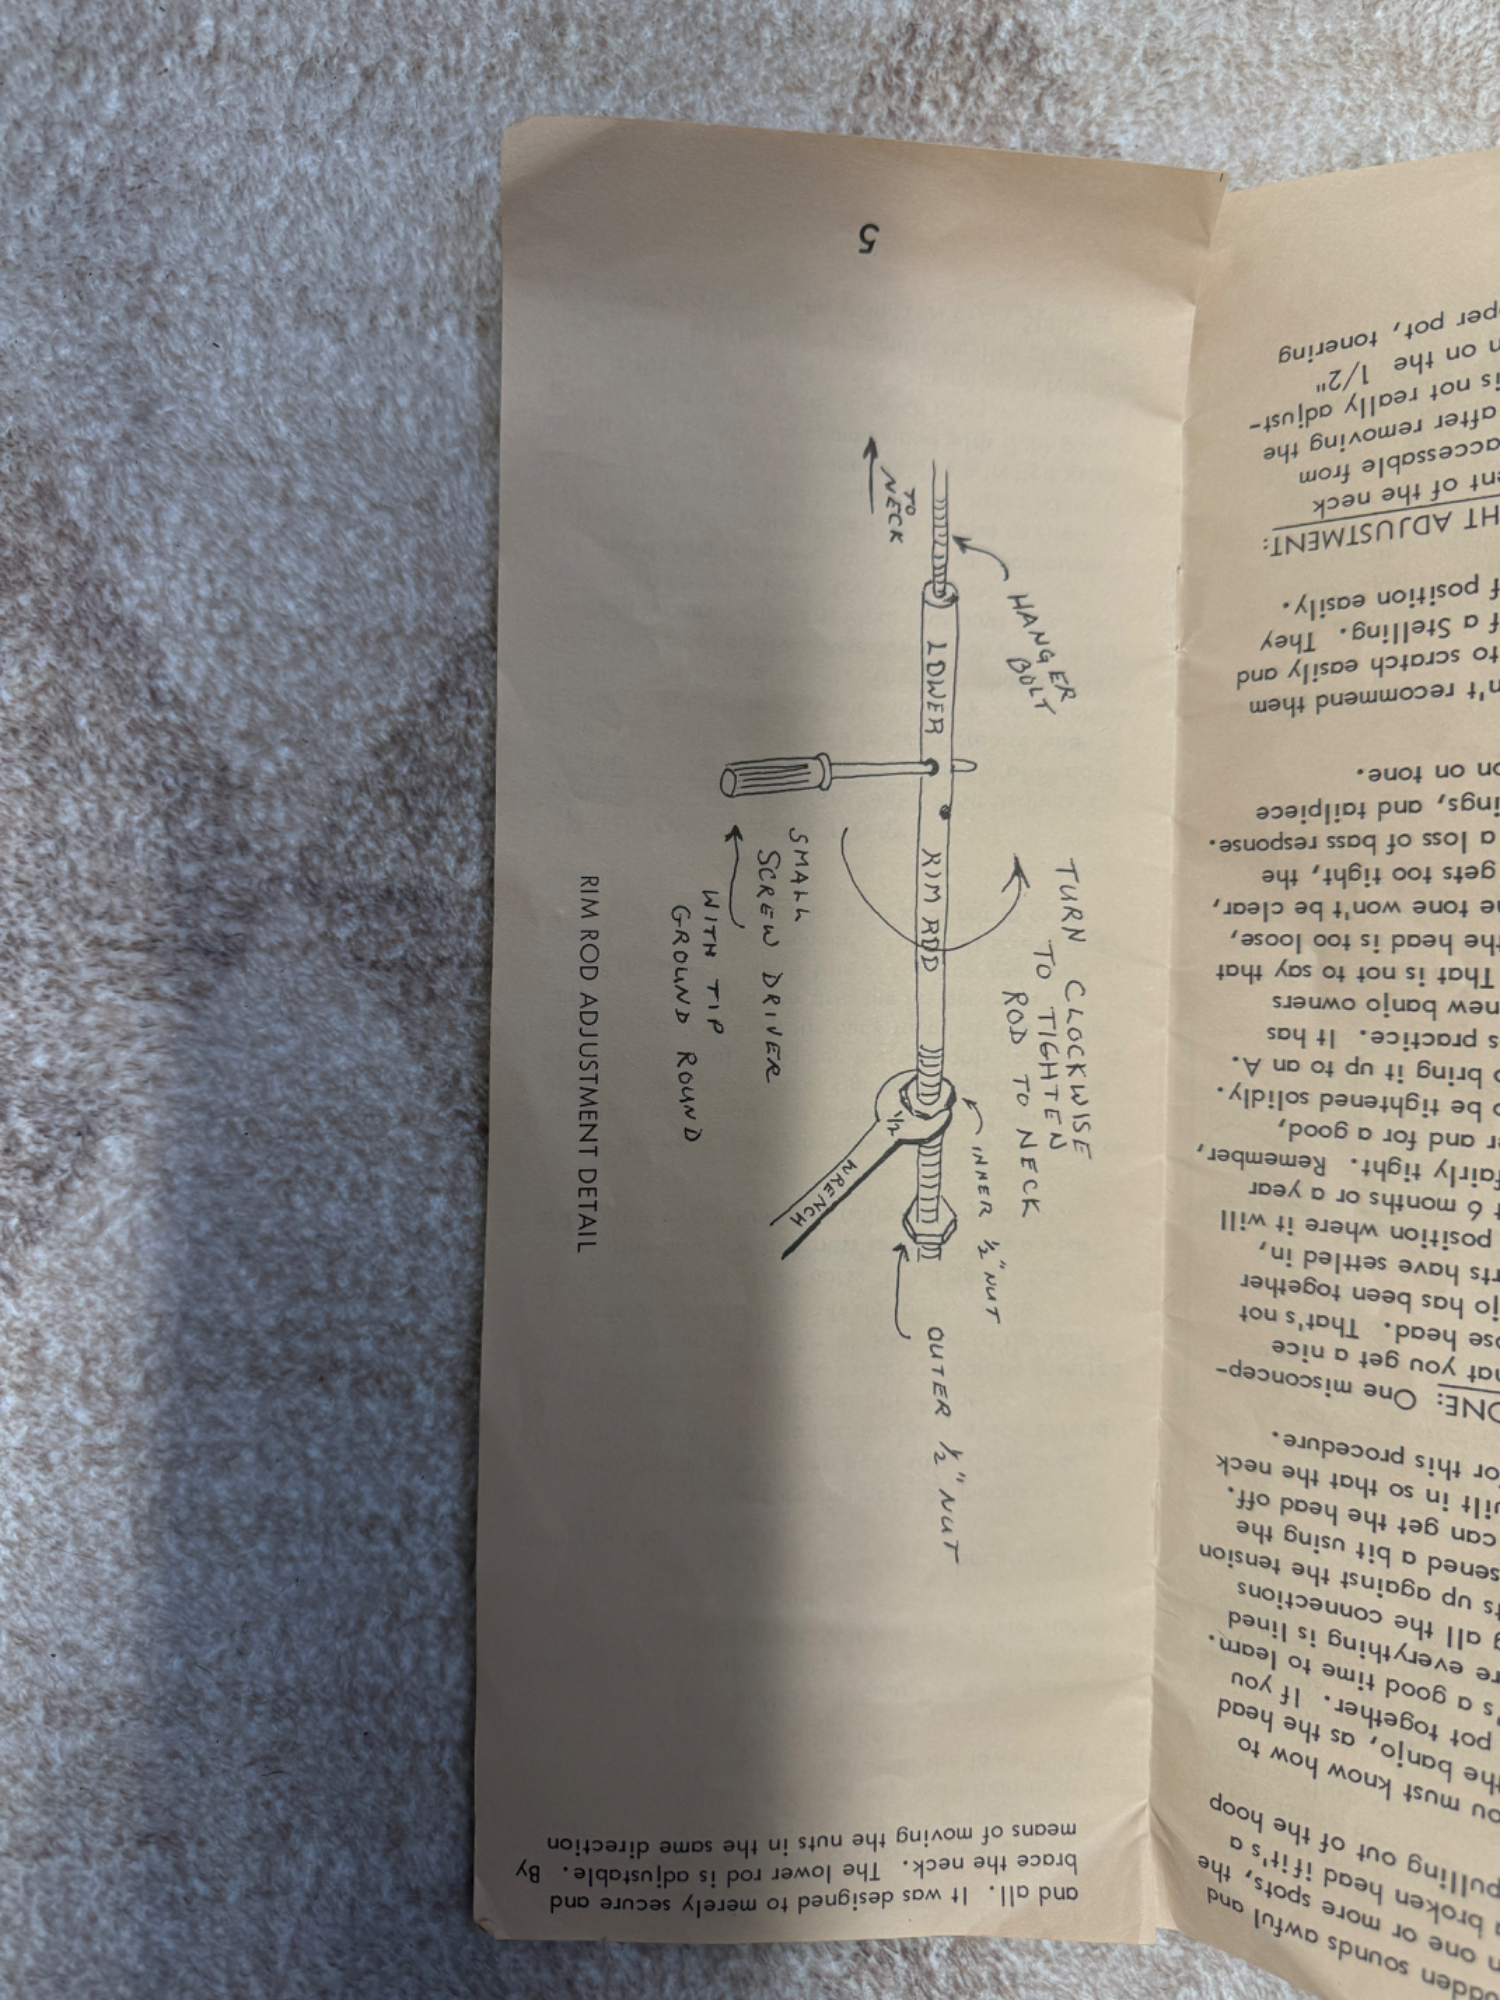
String height and the attachment of the neck are effected by two steel rods accessible from the underside of the banjo pot after removing the resonator. The uppermost rod is not really adjustable although excessive tension on the 1/2″ nut will actually spread the upper pot, tonering and all. It was designed to merely secure and brace the neck. The lower rod is adjustable. By means of moving the nuts in the same direction (out or in) you can either compress or expand the rim slightly to effect up to 1/8″ of string height change. To raise the strings any more than that will require adding shims between the lower heel and rim or else refitting the neck.
TO RAISE STRINGS: loosen the outer nut and tighten the inner nut.
TO LOWER STRINGS: loosen the inner nut and tighten the outer nut.
After adjusting the lower rod, check upper rod’s nut for snugness.
The rim rods secure the neck by means of internal threads inside the neck side of the rods. The rods screw over the hanger bolts which extend through the rim from the heel of the neck. A small nail or miniature screw driver can be inserted in the holes at the center of each rod to tighten the rods or to hold the rods stationary while manipulating the 1/2″ nuts. It’s a good idea to check this area for tightness several times a year or at least every time you adjust string height.
If the neck is ever removed and then put back on for any reason, you must loosen the 1/2″ nuts (all three) before loosening or tightening the rods at the heel. Be careful to tighten the rods only to the snug point (enough to keep the neck from twisting on the pot) for it is possible to strip the hanger bolts right out of the neck. That’s true of the truss rod cover screws, too, in the peghead. For small screws and nuts, small tools should be used so as not to over-torque them.
How Tone is Affected by String Height and Gauges
Most beginners tend to like very low action for a variety of reasons. One is that they don’t have to be as precise when fretting. There’s less distance to worry about between the fingerboard and strings. They can change chords faster and more easily. Also low action doesn’t put dents in uncalloused fingertips. But boy! Does the tone and volume suffer! Try choking the strings without sliding right over them. Try a good clean pull-off. Try sounding like J.D. Crowe or Alan Munde or anybody that has punch in their picking! It would sound like someone picking a fretted snare drum! The problem is compounded with light gauge strings. If a string needs so much room to vibrate, give it the clearance it needs depending on how hard you pick. Heavier strings require smaller clearances you pick. The strings on every Stelling are in the medium range and are very satisfactory for most types of picking, especially hard-driving styles. The string thicknesses affect sustain and volume, also.
Heavier strings ring less but are louder than lighter strings. String tension is directly affected by the fret scale and the length of the neck. So each banjo has its own characteristics. I prefer the tone and volume of the medium (.010″, .012″, .014″, .022″, .010″) strings as they are set up on every Stelling banjo. With medium strings and a string height of 1/8″ to 3/16″ above the 22nd fret, a Stelling will have ample volume, a very pleasing tone, and quite an acceptable playability—without any buzzing or rattling strings!
PLEASE NOTE: All neck and string adjustments described in this booklet are to be done while your banjo is completely strung up with your preferred strings and tuned to pitch.
Bridges, Tone and Intonation
While there have been experiments with many types of bridges, a straight 3-footed maple-ebony bridge is still the best, in my opinion. The new Snuffy Smith bridge is outstanding.
There are several factors to think about when you consider what a bridge does for your banjo. The bridge transmits the vibrations of your strings to the head which in turn vibrates the tone ring. From there the vibrations travel throughout the entire banjo, neck and all. The gauge of strings you use, the thickness of the head, the density of the neck wood all affect how a particular bridge will work on your banjo. Even the tone ring on your banjo may differ slightly from another identical banjo. With all these factors in mind, the bridge’s grain structure (tight or loose) will either brighten or soften tone; the weight of a bridge (heavy or light) will either elongate or shorten sustain; will emphasize or diminish the bass response. The best thing I can do is give two examples. From there on you can experiment.
Example 1. My own banjo has a curly maple neck, medium-heavy strings (a .015″ third and a .024″ fourth) and a frosted top Remo head (which is thicker than a Ludwig or 5-Star). The bridge I prefer is one of medium weight, medium tight grain and has more maple in it than some others I’ve tried. I tried one with looser grain structure and less wood and got too mellow a tone from the grain structure with an added brightness from the lighter weight. I didn’t like that combination on my banjo because it wasn’t as solid sounding as with the first bridge.
Example 2. A Whitestar model banjo with a hard rock maple neck has medium gauge strings (.014 third and .022″ fourth) and a Ludwig head (standard for most Stellings). The bridge I like best on it is the same loose-grained, light weight one I didn’t like on my banjo.
On a walnut banjo, I might prefer a bridge with tighter grain, but remember how all the different factors contribute to an individual banjo’s tone. The best thing to do is set your banjo up with the strings you like best and then tighten the head to where you think it sounds best with whatever bridge you have. From that point you can modify tone with the tailpiece (if it’s adjustable as is the Stelling tailpiece). If at that point you’re still unhappy try different bridges. If after all that you still aren’t satisfied, try another banjo or give it up altogether!
Hopefully, with all this knowledge (or opinion) you can pick through a pile of bridges with some expertise or you can at least order the type of bridge you think you need. Snuffy Smith would be the one to contact if you really want to get into a heavy bridge discussion. His number is (501) 751-0017. He’s usually there in the afternoon or evenings.
If your banjo seems to be impossible to tune, perhaps the bridge is out of place. Positioning the bridge is easily done by someone with a good ear, although you can get very close by setting the distance from the center of the 12th fret to the center of the bridge to about 13 3/16″ at the third string. The pitch of any string at the 12th fret should be exactly one octave higher than that string played open.
Note that on your Stelling banjo each string is compensated at the nut. Therefore, each string has a different scale length. Because of this built-in feature, any other compensating devices such as the Shubb bridge would be redundant on a new Stelling banjo. A standard bridge should always be used.
Tail Piece Adjustments
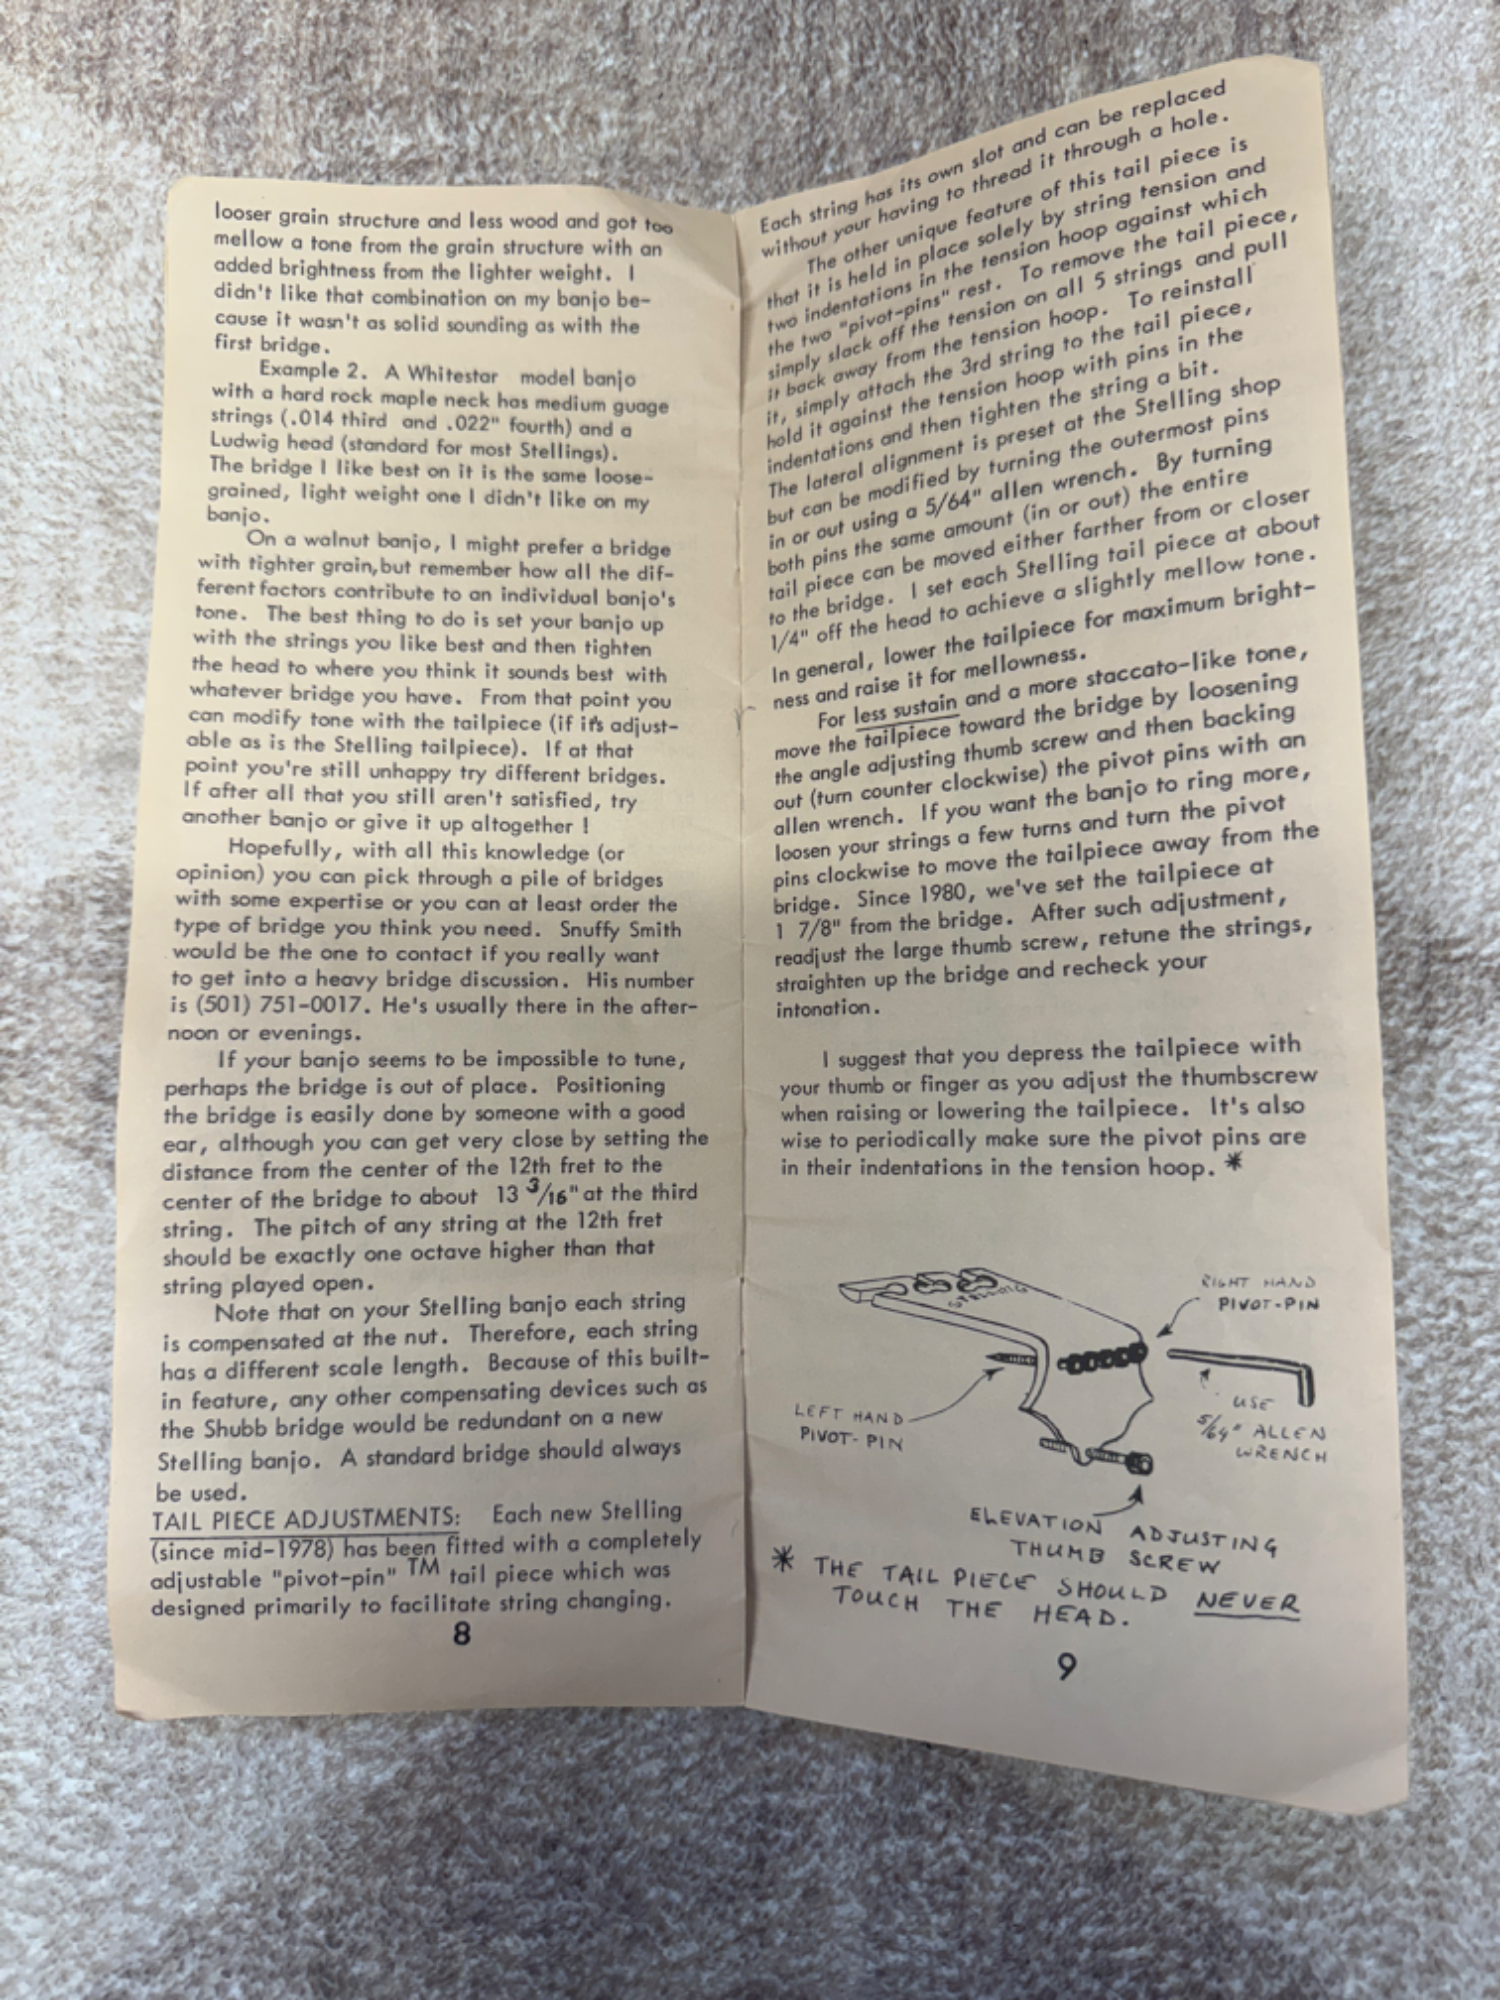
Each new Stelling (since mid-1978) has been fitted with a completely adjustable “pivot-pin” ™ tail piece which was designed primarily to facilitate string changing. Each string has its own slot and can be replaced without your having to thread it through a hole. The other unique feature of this tail piece is that it is held in place solely by string tension and two indentations in the tension hoop against which the two “pivot-pins” rest. To remove the tail piece, simply slack off the tension on all 5 strings and pull it back away from the tension hoop. To reinstall it, simply attach the 3rd string to the tail piece, hold it against the tension hoop with pins in the indentations and then tighten the string a bit. The lateral alignment is preset at the Stelling shop but can be modified by turning the outermost pins in or out using a 5/64″ allen wrench. By turning both pins the same amount (in or out) the entire tail piece can be moved either farther from or closer to the bridge. I set each Stelling tail piece at about 1/4″ off the head to achieve a slightly mellow tone. In general, lower the tailpiece for maximum brightness and raise it for mellowness.
For less sustain and a more staccato-like tone, move the tailpiece toward the bridge by loosening the angle adjusting thumb screw and then backing out (turn counter clockwise) the pivot pins with an allen wrench. If you want the banjo to ring more, loosen your strings a few turns and turn the pivot pins clockwise to move the tailpiece away from the bridge. Since 1980, we’ve set the tailpiece at 1 7/8″ from the bridge. After such adjustment, readjust the large thumb screw, retune the strings, straighten up the bridge and recheck your intonation.
I suggest that you depress the tailpiece with your thumb or finger as you adjust the thumbscrew when raising or lowering the tailpiece. It’s also wise to periodically make sure the pivot pins are in their indentations in the tension hoop.
★ THE TAIL PIECE SHOULD NEVER TOUCH THE HEAD.
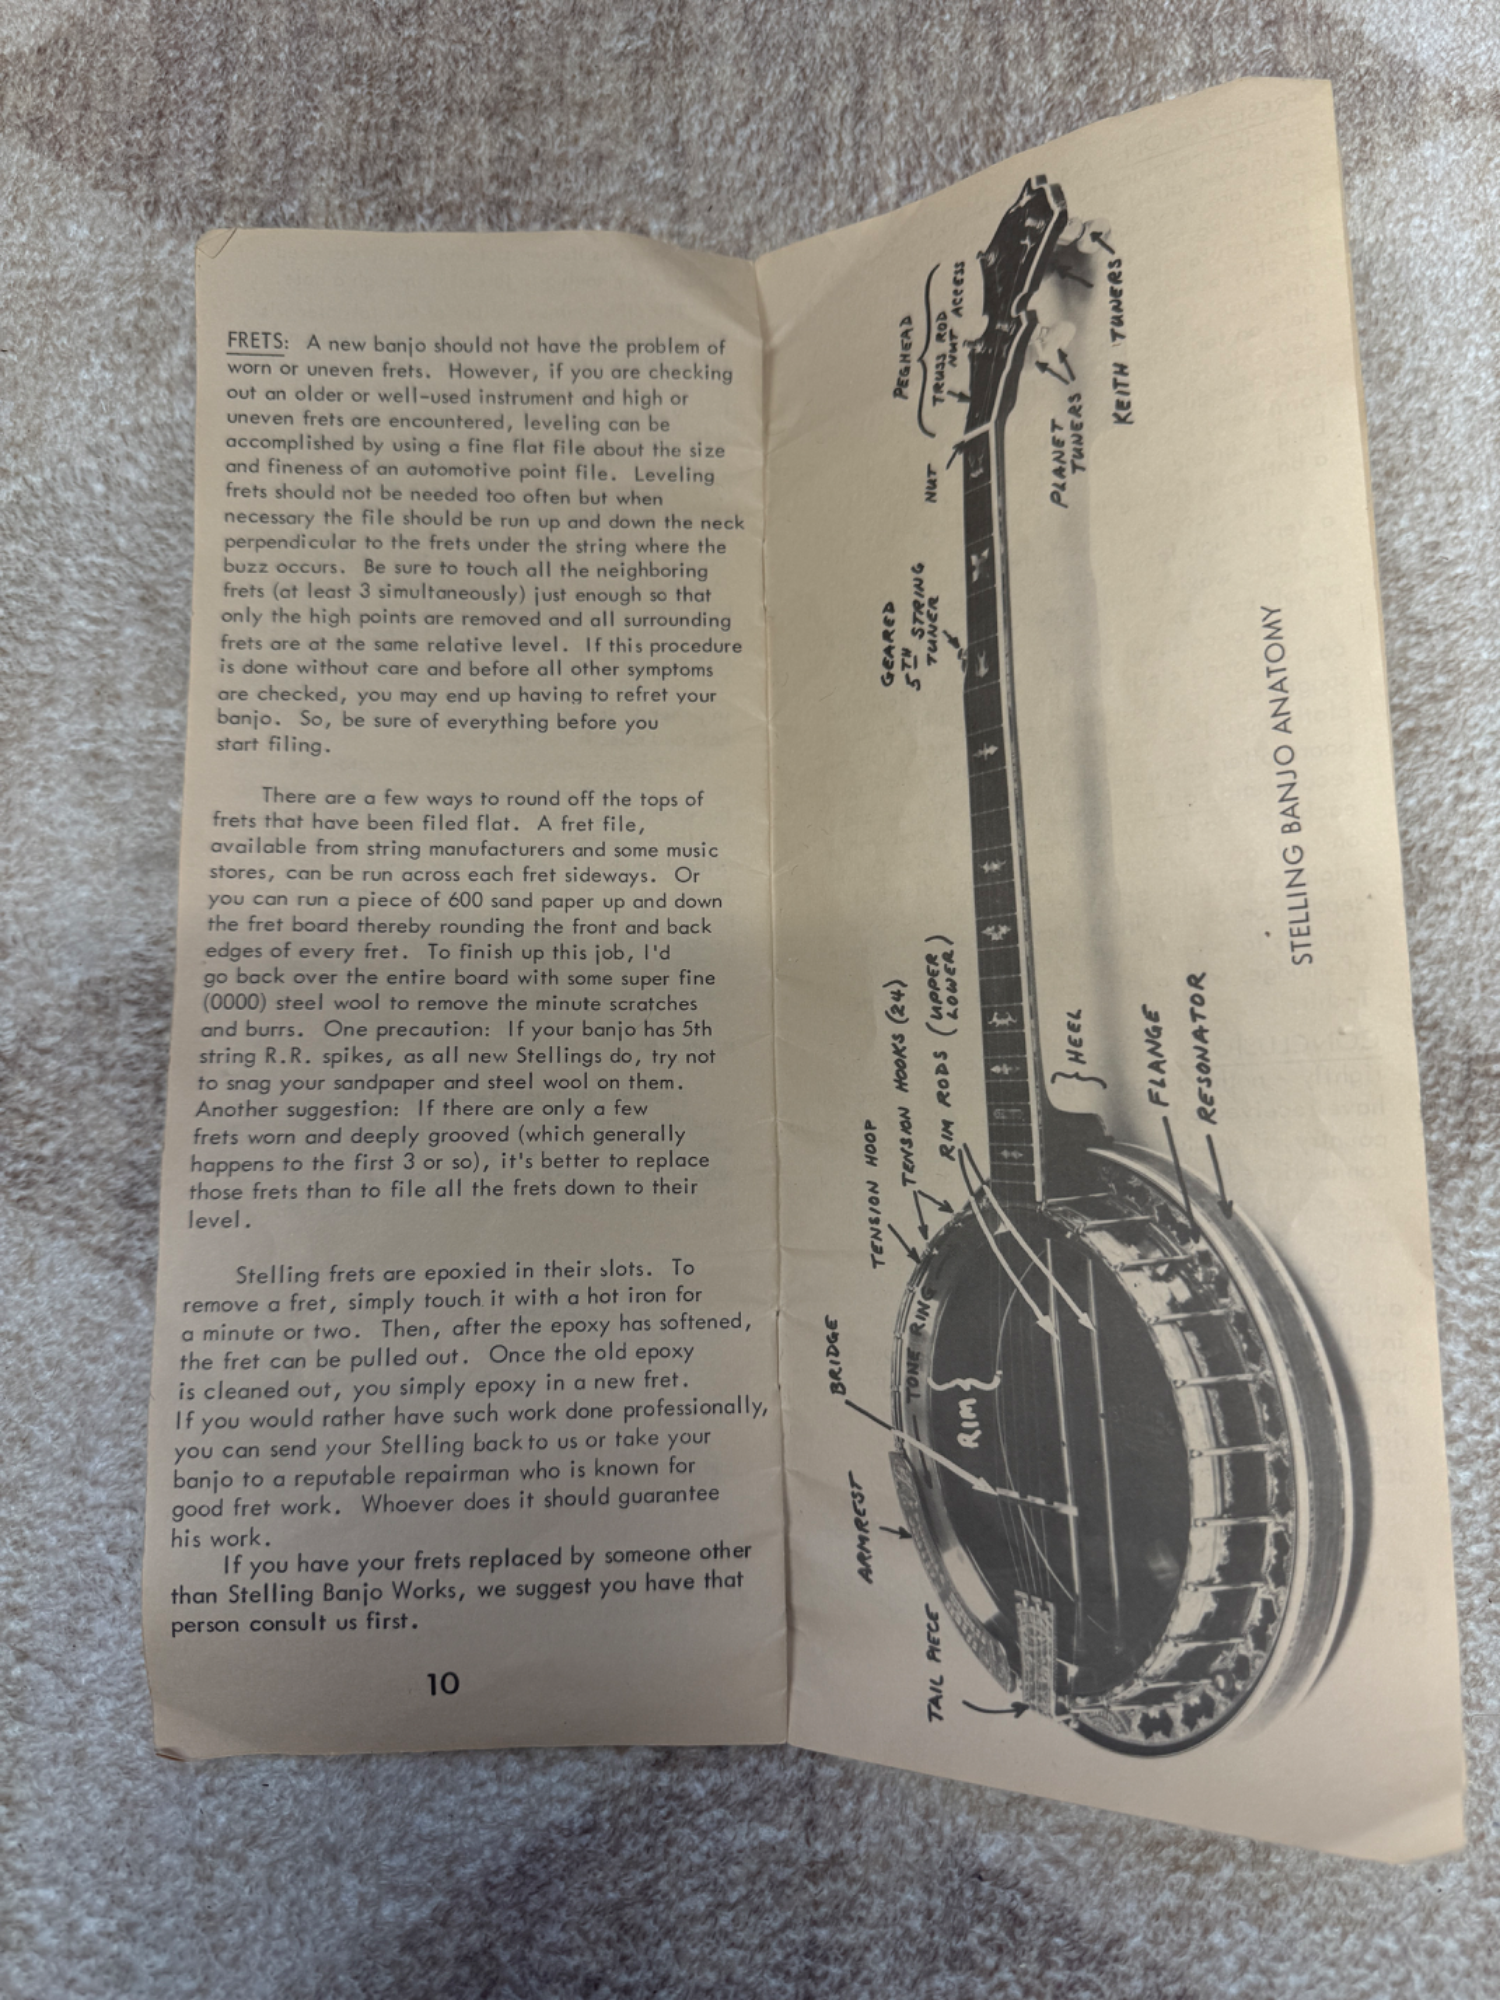
Frets
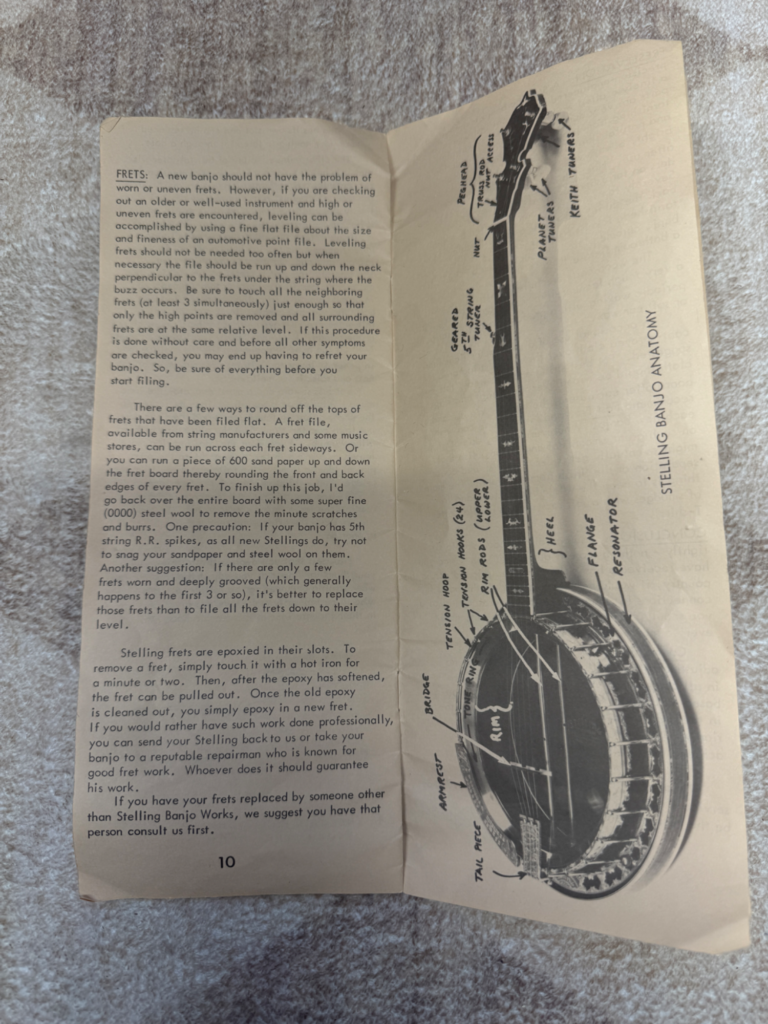
A new banjo should not have the problem of worn or uneven frets. However, if you are checking out an older or well-used instrument and high or uneven frets are encountered, leveling can be accomplished by using a fine flat file about the size and fineness of an automotive point file. Leveling frets should not be needed too often but when necessary the file should be run up and down the neck perpendicular to the frets under the string where the buzz occurs. Be sure to touch all the neighboring frets (at least 3 simultaneously) just enough so that only the high points are removed and all surrounding frets are at the same relative level. If this procedure is done without care and before all other symptoms are checked, you may end up having to refret your banjo. So, be sure of everything before you start filing.
There are a few ways to round off the tops of frets that have been filed flat. A fret file, available from string manufacturers and some music stores, can be run across each fret sideways. Or you can run a piece of 600 sand paper up and down the fret board thereby rounding the front and back edges of every fret. To finish up this job, I’d go back over the entire board with some super fine (0000) steel wool to remove the minute scratches and burrs. One precaution: If your banjo has 5th string R.R. spikes, as all new Stellings do, try not to snag your sandpaper and steel wool on them.
Another suggestion: If there are only a few frets worn and deeply grooved (which generally happens to the first 3 or so), it’s better to replace those frets than to file all the frets down to their level.
Stelling frets are epoxied in their slots. To remove a fret, simply touch it with a hot iron for a minute or two. Then, after the epoxy has softened, the fret can be pulled out. Once the old epoxy is cleaned out, you simply epoxy in a new fret.
If you would rather have such work done professionally, you can send your Stelling back to us or take your banjo to a reputable repairman who is known for good fret work. Whoever does it should guarantee his work.
If you have your frets replaced by someone other than Stelling Banjo Works, we suggest you have that person consult us first.
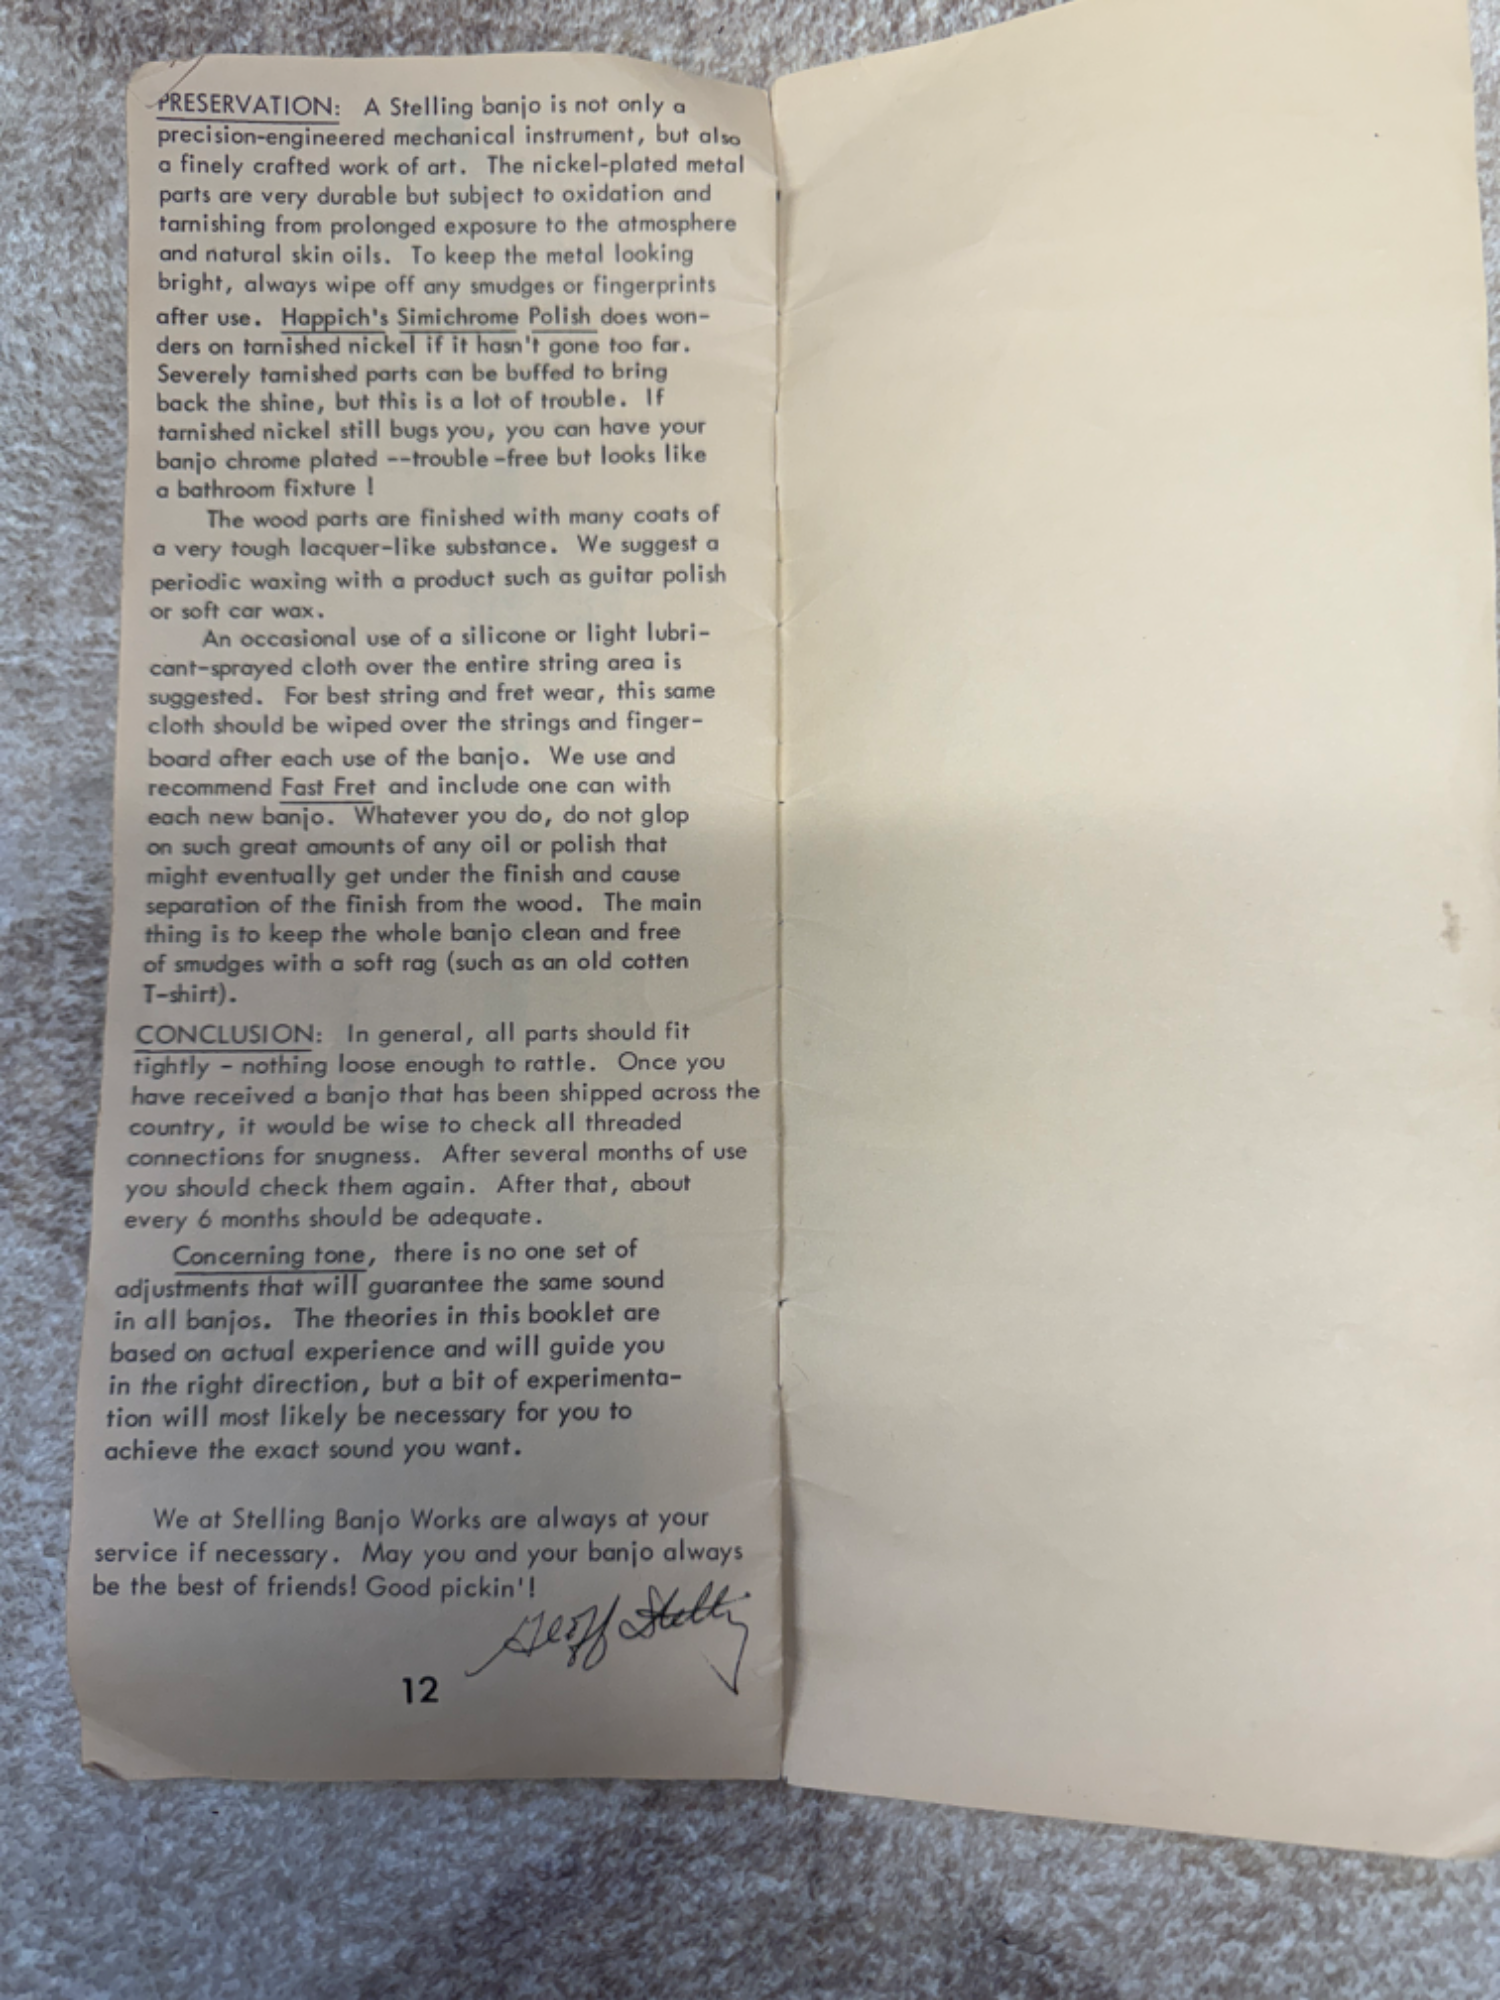
Preservation
A Stelling banjo is not only a precision-engineered mechanical instrument, but also a finely crafted work of art. The nickel-plated metal parts are very durable but subject to oxidation and tarnishing from prolonged exposure to the atmosphere and natural skin oils. To keep the metal looking bright, always wipe off any smudges or fingerprints after use. Happich’s Simichrome Polish does wonders on tarnished nickel if it hasn’t gone too far. Severely tarnished parts can be buffed to bring back the shine, but this is a lot of trouble. If tarnished nickel still bugs you, you can have your banjo chrome plated—trouble-free but looks like a bathroom fixture!
The wood parts are finished with many coats of a very tough lacquer-like substance. We suggest a periodic waxing with a product such as guitar polish or soft car wax.
An occasional use of a silicone or light lubricant-sprayed cloth over the entire string area is suggested. For best string and fret wear, this same cloth should be wiped over the strings and fingerboard after each use of the banjo. We use and recommend Fast Fret and include one can with each new banjo. Whatever you do, do not glop on such great amounts of any oil or polish that might eventually get under the finish and cause separation of the finish from the wood. The main thing is to keep the whole banjo clean and free of smudges with a soft rag (such as an old cotton T-shirt).
Conclusion
In general, all parts should fit tightly – nothing loose enough to rattle. Once you have received a banjo that has been shipped across the country, it would be wise to check all threaded connections for snugness. After several months of use you should check them again. After that, about every 6 months should be adequate.
Concerning tone, there is no one set of adjustments that will guarantee the same sound in all banjos. The theories in this booklet are based on actual experience and will guide you in the right direction, but a bit of experimentation will most likely be necessary for you to achieve the exact sound you want.
We at Stelling Banjo Works are always at your service if necessary. May you and your banjo always be the best of friends! Good pickin’!
— Geoff Stelling
Update: 1988 Stelling Set-Up System
Shortly after we published this post, reader Marc Hester sent us another piece of Stelling history: a March 1988 “Stelling’s Set-Up System” document. This two-page condensed guide was created nearly a decade after the original Field Service Manual and distills the setup process into a quick-reference format.
Thank you, Marc!
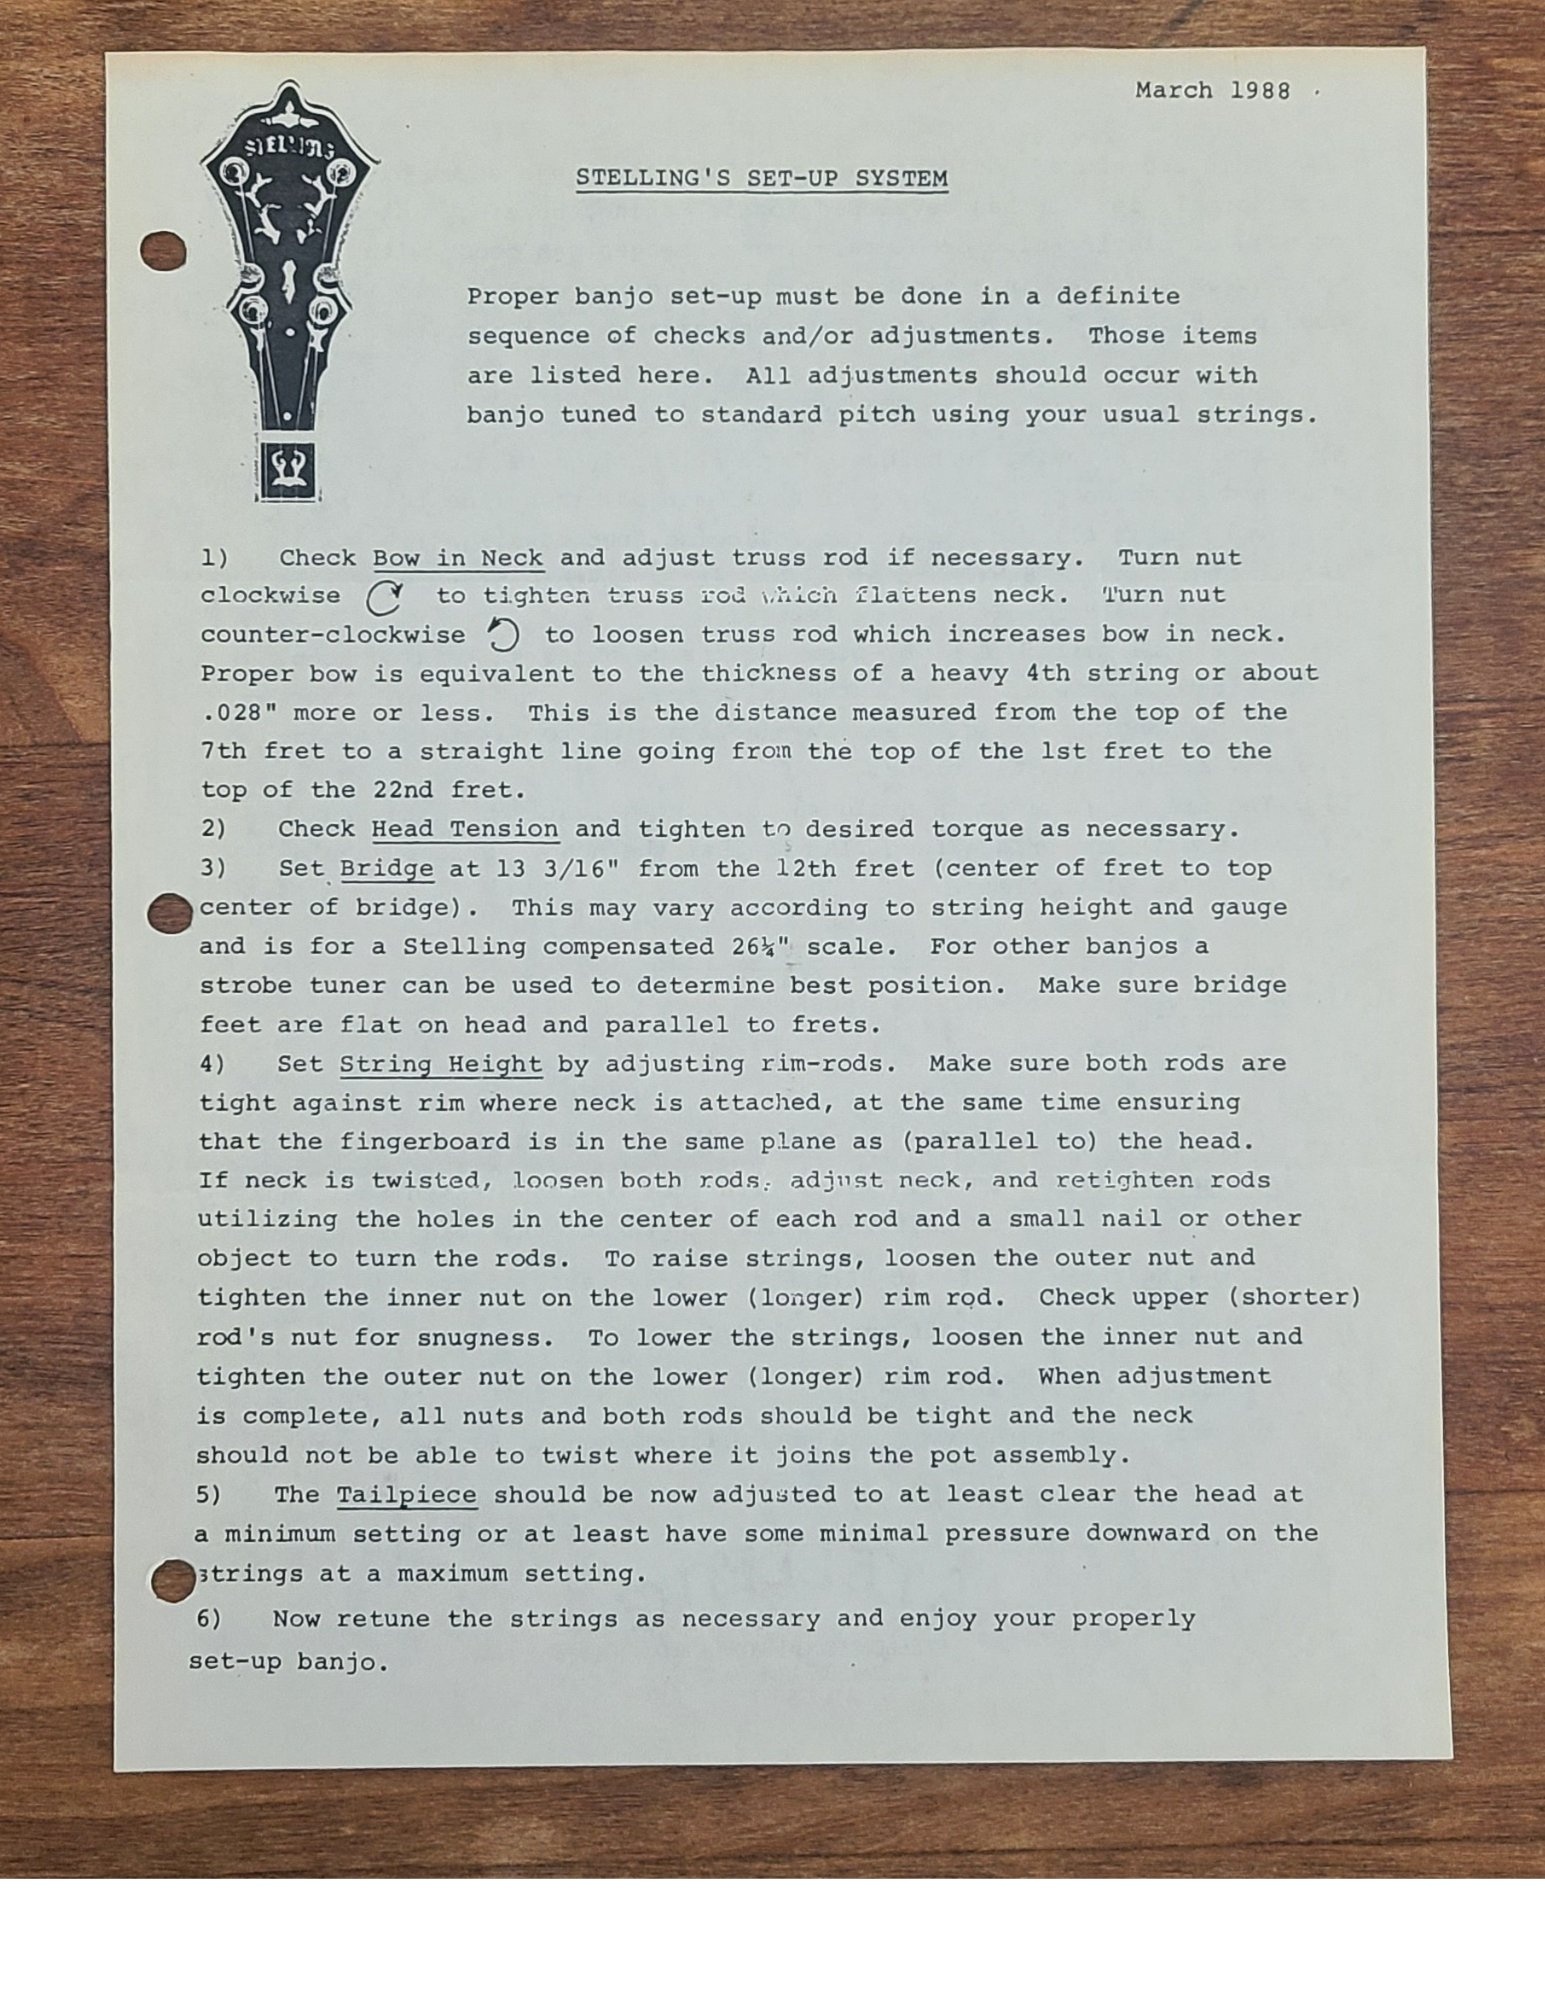
Stelling’s Set-Up System (March 1988)
Proper banjo set-up must be done in a definite sequence of checks and/or adjustments. Those items are listed here. All adjustments should occur with banjo tuned to standard pitch using your usual strings.
1) Check Bow in Neck and adjust truss rod if necessary. Turn nut clockwise to tighten truss rod which flattens neck. Turn nut counter-clockwise to loosen truss rod which increases bow in neck. Proper bow is equivalent to the thickness of a heavy 4th string or about .028″ more or less. This is the distance measured from the top of the 7th fret to a straight line going from the top of the 1st fret to the top of the 22nd fret.
2) Check Head Tension and tighten to desired torque as necessary.
3) Set Bridge at 13 3/16″ from the 12th fret (center of fret to top center of bridge). This may vary according to string height and gauge and is for a Stelling compensated 26⅜” scale. For other banjos a strobe tuner can be used to determine best position. Make sure bridge feet are flat on head and parallel to frets.
4) Set String Height by adjusting rim-rods. Make sure both rods are tight against rim where neck is attached, at the same time ensuring that the fingerboard is in the same plane as (parallel to) the head. If neck is twisted, loosen both rods, adjust neck, and retighten rods utilizing the holes in the center of each rod and a small nail or other object to turn the rods. To raise strings, loosen the outer nut and tighten the inner nut on the lower (longer) rim rod. Check upper (shorter) rod’s nut for snugness. To lower the strings, loosen the inner nut and tighten the outer nut on the lower (longer) rim rod. When adjustment is complete, all nuts and both rods should be tight and the neck should not be able to twist where it joins the pot assembly.
5) The Tailpiece should be now adjusted to at least clear the head at a minimum setting or at least have some minimal pressure downward on the strings at a maximum setting.
6) Now retune the strings as necessary and enjoy your properly set-up banjo.
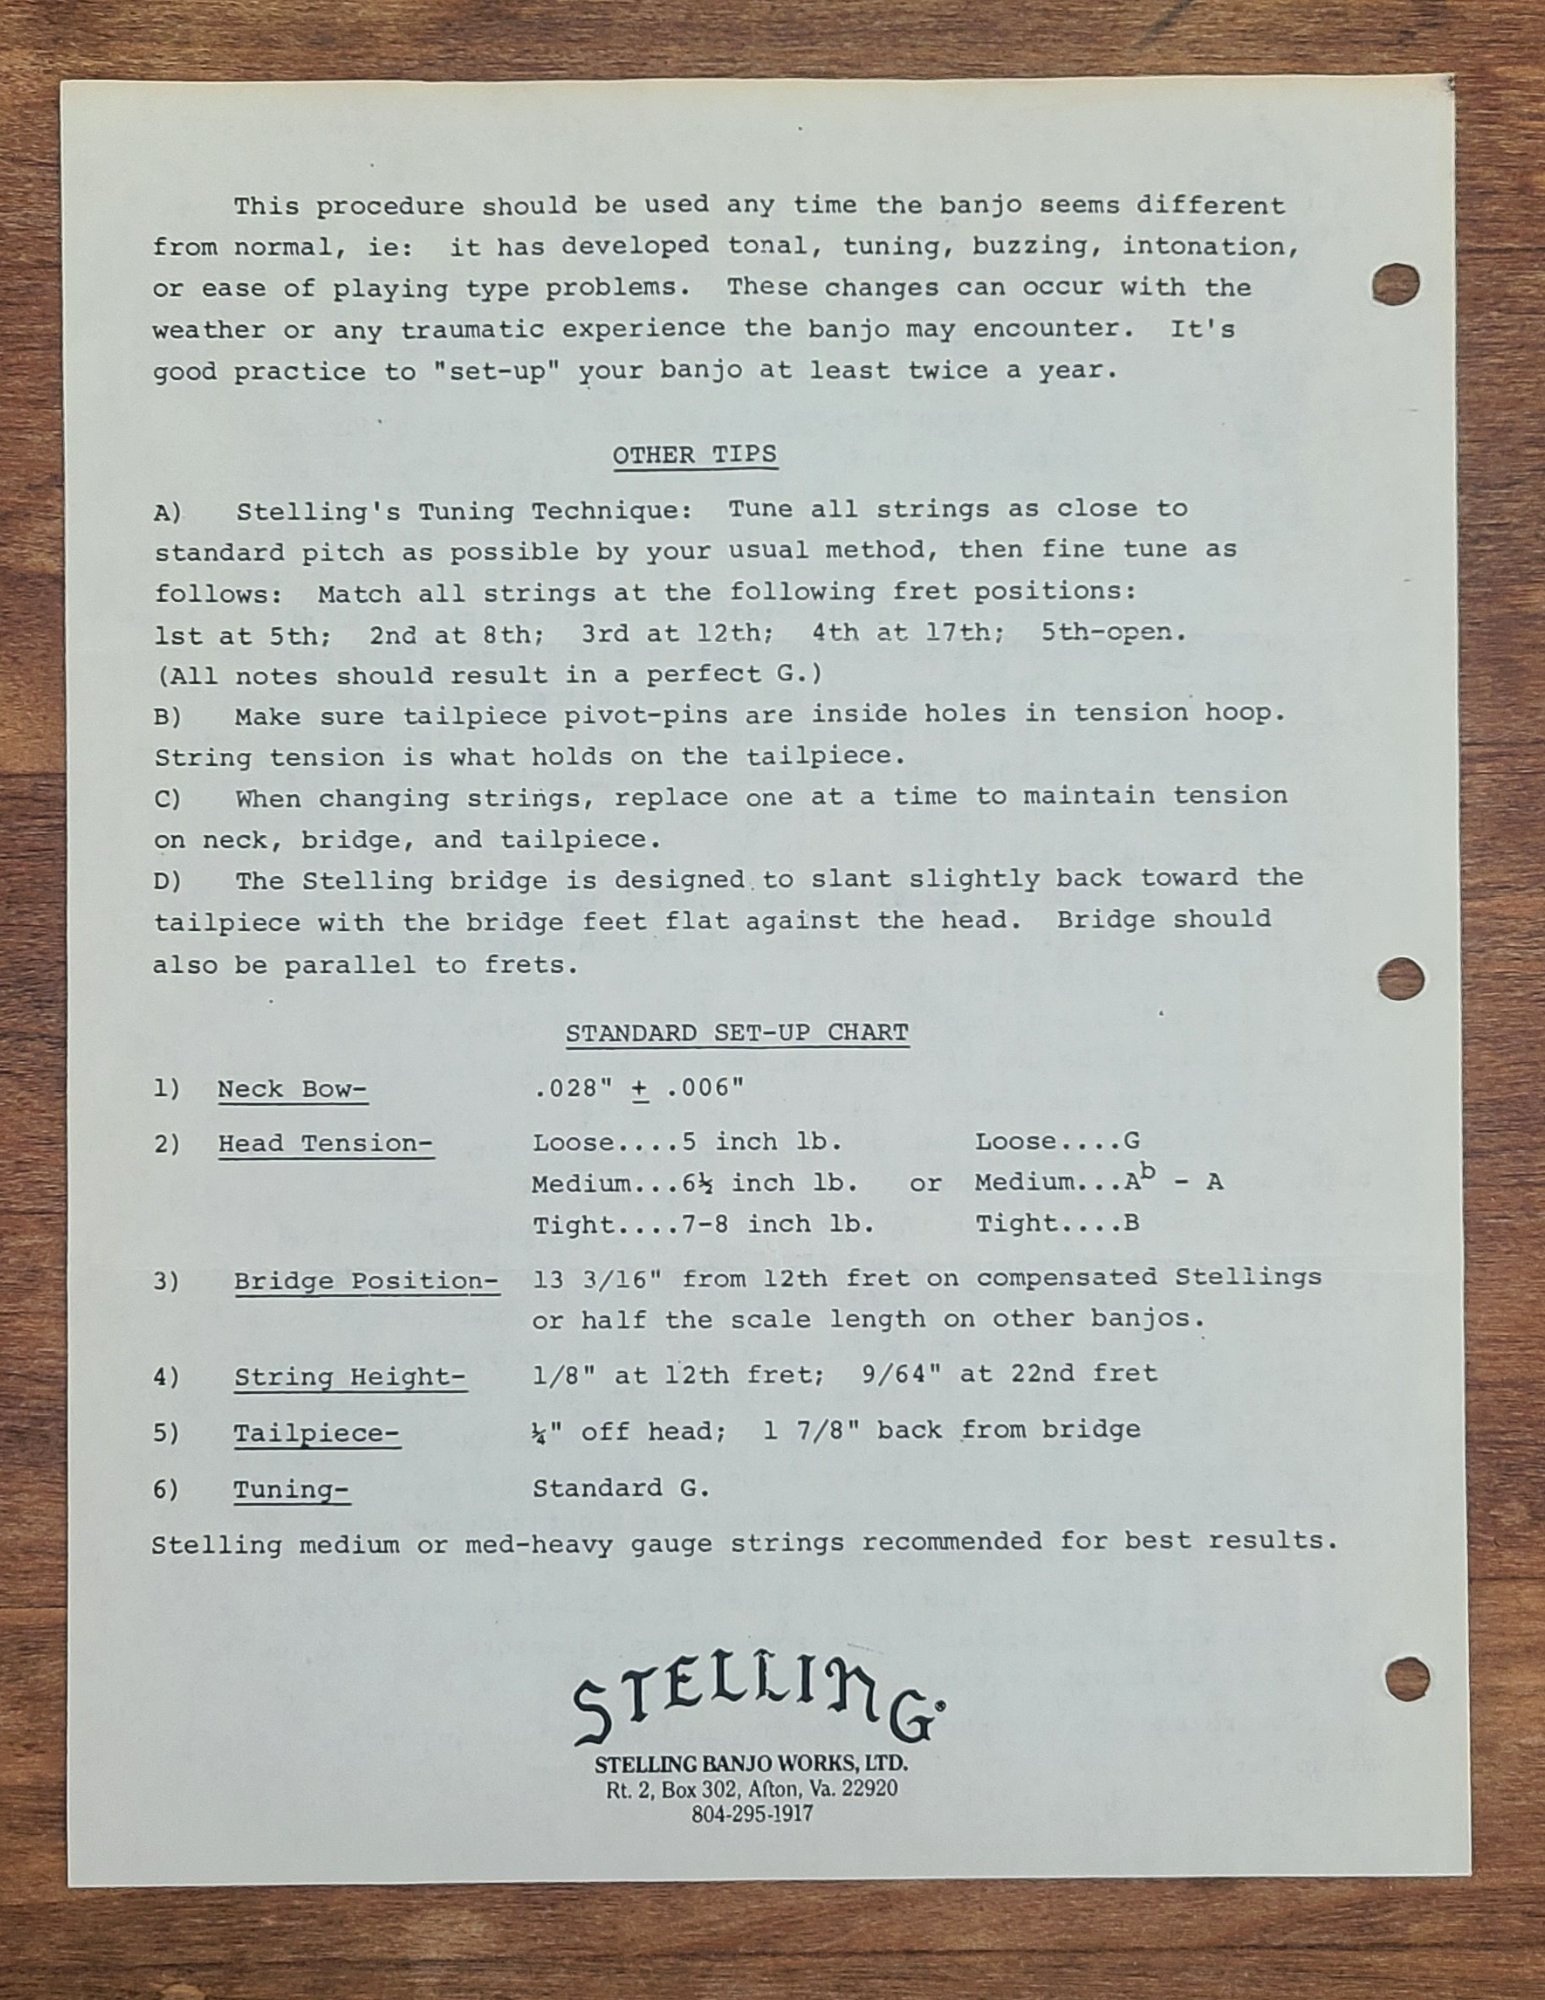
This procedure should be used any time the banjo seems different from normal, ie: it has developed tonal, tuning, buzzing, intonation, or ease of playing type problems. These changes can occur with the weather or any traumatic experience the banjo may encounter. It’s good practice to “set-up” your banjo at least twice a year.
Other Tips
A) Stelling’s Tuning Technique: Tune all strings as close to standard pitch as possible by your usual method, then fine tune as follows: Match all strings at the following fret positions: 1st at 5th; 2nd at 8th; 3rd at 12th; 4th at 17th; 5th-open. (All notes should result in a perfect G.)
B) Make sure tailpiece pivot-pins are inside holes in tension hoop. String tension is what holds on the tailpiece.
C) When changing strings, replace one at a time to maintain tension on neck, bridge, and tailpiece.
D) The Stelling bridge is designed to slant slightly back toward the tailpiece with the bridge feet flat against the head. Bridge should also be parallel to frets.
Standard Set-Up Chart
| Specification | Measurement |
|---|---|
| Neck Bow | .028″ ± .006″ |
| Head Tension | Loose: 5 inch lb. (G) / Medium: 6½ inch lb. (A♭–A) / Tight: 7-8 inch lb. (B) |
| Bridge Position | 13 3/16″ from 12th fret on compensated Stellings, or half the scale length on other banjos |
| String Height | 1/8″ at 12th fret; 9/64″ at 22nd fret |
| Tailpiece | ¼” off head; 1⅞” back from bridge |
| Tuning | Standard G |
Stelling medium or med-heavy gauge strings recommended for best results.
What is the Stelling Banjo Field Service Manual?
A 12-page setup and maintenance guide written by Geoff Stelling in 1979, covering neck adjustment, head tension, bridge selection, tailpiece setup, fret work, and preservation for Stelling banjos.
Where can I download the Stelling manual for free?
The complete 1979 Stelling Banjo Field Service Manual is available for free in the Bluegrass Banjo Library at Banjo Warehouse.
Does the Stelling setup guide work for other banjos?
Yes. While written for Stelling owners, the principles of truss rod adjustment, head tension, string height, and bridge placement apply to most 5-string bluegrass banjos.
How tight should a banjo head be?
According to Geoff Stelling, the head should be tightened to approximately an A pitch. Too loose sounds clangy; too tight loses bass response.
What string height does Stelling recommend?
Stelling recommends 1/8″ to 3/16″ above the 22nd fret with medium gauge strings for optimal tone and volume.
What is the 1988 Stelling Set-Up System?
A condensed two-page setup guide created by Stelling Banjo Works in March 1988. It distills the 1979 Field Service Manual into a quick-reference format with a 6-step setup procedure and a Standard Set-Up Chart with exact specifications for neck bow, head tension, bridge position, string height, and tailpiece.
What is the Stelling Banjo Field Service Manual?
A 12-page setup and maintenance guide written by Geoff Stelling in 1979, covering neck adjustment, head tension, bridge selection, tailpiece setup, fret work, and preservation for Stelling banjos.
Where can I download the Stelling manual for free?
The complete 1979 Stelling Banjo Field Service Manual is available for free in the Bluegrass Banjo Library at Banjo Warehouse.
Does the Stelling setup guide work for other banjos?
Yes. While written for Stelling owners, the principles of truss rod adjustment, head tension, string height, and bridge placement apply to most 5-string bluegrass banjos.
How tight should a banjo head be?
According to Geoff Stelling, the head should be tightened to approximately an A pitch. Too loose sounds clangy; too tight loses bass response.
What string height does Stelling recommend?
Stelling recommends 1/8″ to 3/16″ above the 22nd fret with medium gauge strings for optimal tone and volume.